01-一些概念和SOLID原则
开坑设计模式
本来是计划学完基本语法再进行设计模式的学习,但这学期UML考试要考几个设计模式,我也就顺手先把这几个学了吧~
设计模式一共有3大类23种:
- 创建型设计模式:构造器、工厂、原型、单例
- 结构型设计模式:适配器、桥接、组合、装饰器、外观、享元、代理
- 行为型设计模式:职责链、命令、解释器、迭代器、中介者、备忘录、空对象、观察者、状态、策略、模板方法、访问者
学好设计模式可以让程序员探究:对于特定的问题,如何权衡不同的技术复杂度和不同评价指标,从而给出多种不同的解决方案。
创建型设计模式
创建型设计模式是与对象创建相关的通用方法。在没有创建型设计模式时,在C++中创建对象的行为充满了危险。是在栈上创建对象,还是在堆上?是要用原始指针还是用智能指针?是手动创建更合适,还是应将包含所有关键信息的创建过程让其他对象管理……学了创建型设计模式后,一切将迎刃而解。
结构型设计模式
结构型设计模式主要关注如何设置应用程序的结构,以满足SOLID设计原则,提高代码的通用性和可重构性。谈到对象的结构时,可用下面几种常用的方式:
- 继承:对象可以直接获得基类的非私有成员和方法。
- 组合:组合是一种 部分与整体 的关系,部分不可以离开整体而单独存在。例如,某对象有个类型为
T的成员,该对象销毁后,成员也随之销毁。 - 聚合:聚合也是一种部分与整体的关系,部分和整体可以单独存在。例如,某对象有个类型为
T*或shared_ptr<T>的成员。
行为型设计模式
行为型设计模式涵盖了非常广泛的行为,这些行为在编程过程中十分常见。它并没有中心主题,虽然不同模式间可能有相似的地方,但大多数模式都提供了解决特定问题的独特方法。
一些语法概念
PS:写这篇文章的时候C++语法还没过完(如模板,概念等),有的是照搬课本的,可能有错误,希望大佬们可以在评论区指出~~
奇异递归模板模式 CRTP
奇异递归模板模式(Curiously Recurring Template Pattern, CRTP),它的设计理念是 继承者将自身作为模板参数传递给基类:
class Foo : BaseClass<Foo>
{
    // ...
};
CRTP主要有两大特点:
派生类可以将自身的信息传递给基类。
template <typename Derived>
class BaseClass
{
public:
	void printType()
	{
		string_view name = typeid(Derived).name();
		cout << "This is " << name.substr(6) << " speaking!" << endl;
	}
};

class MyClass1 : public BaseClass<MyClass1> {};
class MyClass2 : public BaseClass<MyClass2> {};

int main()
{
    MyClass1 my_class1;
	MyClass2 my_class2;

	my_class1.printType();
	my_class2.printType();
}

// 输出
This is MyClass1 speaking!
This is MyClass2 speaking!
这段代码可以在基类中获取到派生类的类名,并将它输出。
也可以在基类的实现中访问特定类型的
this指针。template <typename Derived> class Base { public: void name() { cout << "Base Calling: "; (static_cast<Derived*>(this))->impl(); } }; class D1 : public Base<D1> { public: void impl() { cout << "This is D1" << endl; } }; int main() { D1 d1; d1.name(); } // 输出 Base Calling: This is D1基类的
this指针经由static_cast转换为Derived的this指针了。
静态多态
旧风格静态多态(CRTP)
从上边可以看出,CRTP似乎很擅长于多态,接下来康康用它实现的静态多态。
首先实现一个通知基类Notifier,它可以通过不同的方式通知某人某个事件:
template <typename TImpl>
class Notifier
{
public:
    void alertSMS(string_view msg) { impl().sendAlertSMS(msg); }
    void alertEmail(string_view msg) { impl().sendAlertEmail(msg); }
private:
    TImpl& impl() { return static_cast<TImpl&>(*this); }
    friend TImpl;
};
接下来就能定义多种通知器了,例如:
class TestNotifier : public Notifier<TestNotifier>
{
public:
    void sendAlertSMS(string_view msg) { cout << "SMS: " << msg << endl; }
    void sendAlertEmail(string_view msg) { cout << "Email: " << msg << endl; }
};
// ......
为了方便测试,可以定义一个模板函数:
template <typename TImpl>
void alertAll(Notifier<TImpl>& notifier, string_view msg)
{
    notifier.alertEmail(msg);
    notifier.alertSMS(msg);
}
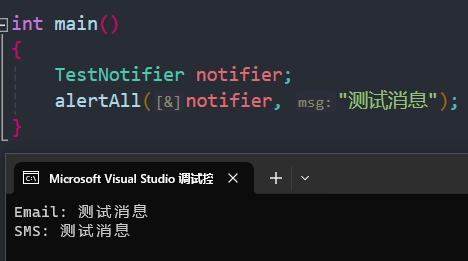
可以发现最终用CRTP实现了静态多态:

但这样似乎有点别扭(impl接口很奇怪),为什么不用基类+virtual方法呢;并且sendAlertSMS()跟alertSMS()也不是完全相同的方法。
概念与静态多态
在C++20中引入了概念(Concept),有了概念,我们就再也不需要基类Notifier了:
template <typename TImpl>
concept IsANotifier = requires(TImpl impl)
{
    impl.alertSMS(string_view{});
    impl.alertEmail(string_view{});
};IsANotifier概念要求传入的模板参数TImpl必须有这两个成员函数。接下来看看修改的测试函数和一个符合该概念的类:
// 引入概念后的测试函数
template <IsANotifier TImpl>
void alertAll(TImpl& notifier, string_view msg)
{
    notifier.alertEmail(msg);
    notifier.alertSMS(msg);
}
// 符合概念的类
class TestNotifier
{
public:
    void alertSMS(string_view msg) { cout << "SMS: " << msg << endl; }
    void alertEmail(string_view msg) { cout << "Email: " << msg << endl; }
};
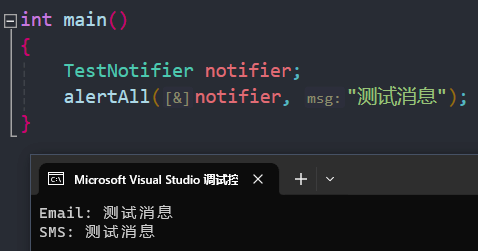
测试结果也是正确的,可见使用概念方便了很多,我们甚至不需要基类就能实现多态:

Mixin继承
在C++中,类可以继承它的模板参数,例如:
template <typename Mixin>
class MyClass : Mixin
{
	// ...
};
这就是Mixin继承(Mix in),它允许不同类型的分层组合。例如可以实例化一个叫做Foo<Bar<Baz>> x;类型的对象,它实现了三个类的特性,而不需要实际构造一个全新的FooBarBaz类型。
它和概念组合使用很强大,因为它允许我们对Mixin继承的类型施加约束,并使我们可以准确地使用基类的特性,而不依赖于编译时错误来告诉我们做错了什么。详见装饰器模式。
属性
属性是一个(通常为private)类成员以及一个getter和setter方法的组合。在标准C++中,如同下边的示例:
class Person
{
public:
	int get_age() const { return age; }
	void set_age(int value) { age = value; }
private:
	int age;
};
需要显式调用它们来获取/修改这个变量。
但是有一个在大多数编译器(MSVC,Clang等)中使用的property非标准声明符,可以将属性直接嵌入编程语言中来内化属性的概念:
class Person
{
private:
    int age_;
public:
    int get_age() const
    {
        cout << "Call get_age()" << endl;
	    return age_;
    }
    void set_age(int value)
    {
        cout << "Call set_age()" << endl;
	    age_ = value;
    }
    __declspec(property(get = get_age, put = set_age)) int age;
};可以通过编译指示符__declspec(property(...))在成员声明中通过关键字get和put来指定getter和setter方法。然后,这个age就会成为一个虚拟成员,它没有分配内存,但试图访问和写入该成员的操作将会用getter和setter方法来替换:

SOLID设计原则
SOLID是一个缩写词,代表以下设计原则:
- 单一职责原则(Single Responsibility Principle, SRP)
- 开闭原则(Open-Closed Principle, OCP)
- 里氏替换原则(Liskov Substitution Principle, LSP)
- 接口隔离原则(Interface Segregation Principle, ISP)
- 依赖倒转原则(Dependency Inversion Principle, DIP)
这5个特定的主题贯穿整个设计模式和软件设计的讨论中。
单一职责原则
单一职责原则:每个类只有一个职责,只有该职责变化时,该类才做相应的修改。
例如有个日记类,它负责维护日记记录(增删改查等)。某天我们突然想要增加一个持久化存储的功能,需要将它单独封装成一个类。因为不这样做就违反了单一职责原则,造成日记类的臃肿和(可能存在的)一堆小重构。
违反单一职责原则的一个极端的反面模式被称为 上帝对象(God Object),形容它承担了很多职责,看懂它很麻烦。
开闭原则
开闭原则:软件实体对扩展开放,对修改关闭,就是不必返回到已经编写和测试好的代码去修改它。
假设有个产品类,拥有颜色、尺寸等属性。我们需要对这组产品进行过滤,例如对颜色进行过滤,可以写一个byColor()来过滤颜色。过了几天,又要求对尺寸进行过滤,那就再增加一个bySize();又过几天,要求对颜色和尺寸都进行过滤,增加一个byColorAndSize()……久而久之,过滤器会越来越臃肿,很是麻烦。
接下来,我们将利用单一职责原则和开闭原则来好好改善上述情形。
根据开闭原则,我们希望上述过滤器是可扩展的(可能分布在不同头文件),而不是必须去修改它(或者重新编译那些正在运行并且可能已经推送给用户的一些头文件)。
根据单一职责原则,我们将过滤器划分为两个部分:
- 过滤器:一个以所有item为输入,返回部分item的过程
- 规范:定义如何过滤这些item
规范接口Specification<T>可以这样定义:
template <typename T>
class Specification
{
public:
    virtual bool isSatisfied(T* item) = 0;
};
传入类型由我们决定,这样大大增加了代码的可重用性。
然后基于这个规范接口,定义过滤器Filter<T>:
template <typename T>
class Filter
{
public:
    virtual vector<T*> filter(vector<T*> items, Specification<T>& spec) const = 0;
};
然后就能实现有详细规则的规范和遍历所有元素进行验证的过滤器了:
// 遍历所有元素的过滤器
class MyFilter : public Filter<Product>
{
public:
    vector<Product*> filter(vector<Product*> items, Specification<Product>& spec) override
    {
        vector<Product*> result;
        for (auto& p : items)
        {
            if (spec.isSatisfied(p))
            {
                result.push_back(p);
            }
        }
        return result;
    }
}

// 颜色规范
class ColorSpecification : public Specification<Product>
{
public:
    explicit ColorSpecification(const Color color) : color{color} {}
    bool isSatisfied(Product* item) override
    {
        return item->color == color;
    }
private:
    Color color;
}

// 尺寸规范
我们还能拓展一下规范,搞一个规范组合器:
template <typename T>
class AndSpecification : Specification<T>
{
public:
    AndSpecification(Specification<T>& first, Specification<T>& second)
        : first{first}, second{second} {}
    bool isSatisfied(T* item) override
    {
        return first.isSatisfied(item) && second.isSatisfied(item);
    }
private:
    Specification<T>& first;
    Specification<T>& second;
}
可以发现利用开闭原则设计类很有条理,最终设计好的类如下:

里氏替换原则
里氏替换原则:如果某个接口以基类Parent类型的对象为参数,那么它应该同等地接受子类Child类型的对象作为参数,并且程序不会产生任何异常。
例如有个矩形类Rectangle,他有宽度和高度两个属性,有通过宽度高度计算面积的方法。接下来创建一个正方形Square子类,它重写了父类两个属性的setter(让宽=高/高=宽)。然后定义一个函数,传入一个矩形类变量:
void process(Rectangle& r)
{
    int w = r.getWidth();
    r.setHeight(10);
    cout << "期望得到面积 = " << (w * 10) << "\n实际得到面积 = " << r.area() << endl;
}
传入矩形类时可以正常运行,但传入正方形类时,输出不匹配(例如边长为5的正方形,期望 5 * 10,实际5 * 5)。先不论正方形的几何意义,这个函数违法了里氏替换原则,程序接受子类对象,但产生了异常。
更好的做法是给矩形和正方形准备一个工厂类,将在后续补充。
接口隔离原则
接口隔离原则:将所有接口拆分开,让实现者根据自身需求挑选接口并实现。从而避免程序员强制实现某些他们实际上并不需要的接口。
例如要设计一个多功能打印机,他能完成打印、扫描甚至传真等功能:
// IMachine 接口
class IMachine
{
public:
    virtual void print() = 0;
    virtual void fax() = 0;
    virtual void scan() = 0;
}
// 多功能打印机
class MyPrinter : public IMachine
{
public:
    void print() override;
    void fax() override;
    void scan() override;
}
这样做目前看起来没问题,但如果想要设计一个只能打印的机器,剩下的两个方法就显得有点冗余了。我们可以把这三个接口分开定义,然后再定义我们的打印机接口啥的(自动生成的图好烂啊):

依赖倒转原则
依赖倒转原则:
- 高层模块不应该依赖底层模块,它们都应该依赖抽象接口。
- 抽象接口不应该依赖细节,细节应该依赖抽象接口。
依赖接口或基类要优于依赖具体类型,因为这一原则可以更好地支持程序的可配置性和可测试性。
例如有个Reporting模块,它要依赖ILogger接口:
class Reporting
{
private:
    ILogger& logger;
public:
    Reporting(const ILogger& logger) : logger{logger} {}
}问题在于,当初始化这个类时,我们需要显式调用Reporting{xxxLogger{}}或做类似的工作,依赖的接口多了就会很麻烦。
这时候 依赖注入 便派上了用场,C++中依赖注入就是用类似于Boost.DI库来满足某个特殊组件的依赖关系需求。
例如,有一辆汽车,它同时依赖引擎和日志:
// 引擎
class Engine
{
public:
    friend ostream& operator<< (ostream& os, const Engine& engine)
    {
        return os << "Volume: " << engine.volume << " horse_power: " << engine.horse_power << endl;
    }

private:
    float volume = 5.0;
    int horse_power = 400;
};

// 日志
class ILogger
{
public:
	virtual ~ILogger() = default;
	virtual void Log(const string& s) = 0;
};

class ConsoleLogger : public ILogger
{
public:
	ConsoleLogger() = default;

	void Log(const string& s) override
	{
        cout << "LOG: " << s.c_str() << endl;
	}
};

// 小车
class Car
{
public:
    Car(unique_ptr<Engine> engine, const shared_ptr<ILogger>& logger)
        : engine{move(engine) }, logger{ logger }
    {
        logger->Log("Making a Car!");
    }

    friend ostream& operator<< (ostream& os, const Car& obj)
    {
        return os << "Car with engine: " << *obj.engine;
    }

private:
    unique_ptr<Engine> engine;
    shared_ptr<ILogger> logger;
};然后使用Boost.DI进行依赖注入,任何时候,如果有对ILogger接口的需求,就给它提供一个实现类ConsoleLogger:
auto injector = boost::di::make_injector(
	boost::di::bind<ILogger>().to<ConsoleLogger>()
);
auto car = injector.create<Car>();
结果如下:

参考资料
- 《C++20设计模式 可复用的面向对象设计方法》
- CRTP介绍、使用和原理 - 知乎 (zhihu.com)
UML代码(如果有的话)
开闭原则.puml@startuml 123
interface Specification<T>
{
    + isSatisfied(T*) : bool
}

interface Filter<T>
{
    + filter(vector<T*>,\n Specification<T>) : vector<T*>
}

class ColorSpecification
{
    - color
    + isSatisfied(Color) : bool
}

class SizeSpecification
{
    - size
    + isSatisfied(Size) : bool

}

class AndSpecification
{
    - first
    - second
    + isSatisfied(Specification<T>,\n Specification<T>) : bool
}

class MyFilter
{
    + filter(vector<Item*>,\n Specification<Item>) : vector<Item*>
}


Specification <|.. SizeSpecification
Specification <|.. ColorSpecification
Specification <|.. AndSpecification

Filter <|.. MyFilter

@enduml
接口隔离原则.puml@startuml 123
skinparam linetype polyline

interface IPrinter
{
    + print()
}

interface IScanner
{
    + scan()
}

interface IFax
{
    + fax()
}

class Printer
{
    + print()
}

class Photocopler
{
    + print()
    + scan()
}

class Scanner
{
    + scan()
}

IPrinter <|-- Printer
IPrinter <|-- Photocopler
IScanner <|-- Photocopler
IScanner <|-- Scanner

interface IMachine{}

IPrinter <|--- IMachine
IScanner <|--- IMachine
IFax <|--- IMachine

class Machine
{
    - printer : IPrinter&
    - scanner : IScanner&
    - fax : IFax&
    + Machine(p : IPrinter&, s : IScanner&, f : IFax&)
    + print()
    + scan()
    + fax()
}

IMachine <|-- Machine

@enduml