9 - UE中的枚举
本文将介绍UE5中枚举相关内容,包括UENUM(),TEnumAsByte,UMETA()等内容。
在UE中使用枚举
要想在UE中使用枚举,需要UENUM()宏将其添加到虚幻引擎的反射系统中:
UENUM()
enum class ETestEnum : uint8
{
  	EnumValue1,
    EnumValue2,
    EnumValue3
};接下来就能用UPROPERTY()和UFUNCTION()声明带有枚举的变量,函数了。
TEnumAsByte
注意到上面使用的是C++11提供的枚举类,如果想要使用C++提供的原始枚举,需要TEnumAsByte帮忙。
有原始枚举如下:
UENUM()
enum ETestRawEnum
{
  	EnumValue1,
    EnumValue2,
    EnumValue3
};如果直接用UPROPERTY()声明一个枚举变量,将会报错:
error : You cannot use the raw enum name as a type for member
variables, instead use TEnumAsByte or a C++11 enum class with
an explicit underlying type.上面提示说,要用C++11带有类型的枚举类,或者使用带有TEnumAsByte的原始枚举。看看后者是怎么解决的:
UPROPERTY(EditDefaultsOnly, BlueprintReadOnly, Category = "Test")
TEnumAsByte<ETestRawEnum> TestRawEnum;
UMETA()
可以在枚举的每个值上添加UMETA()宏,它也可以通过一些标识符提示虚幻引擎如何处理该值。一些常见的标识符如下:
DisplayName:该标识符可以定义一个新名称,并在编辑器中显示。
UENUM()
enum class ETestEnum : uint8
{
  	EnumValue1 UMETA(DisplayName = "First Value"),
    EnumValue2 UMETA(DisplayName = "Second Value"),
    EnumValue3 UMETA(DisplayName = "Third Value")
};
这样在编辑器中该变量的可选值就变为First Value,Second Value和Third Value。
Hidden:该标识符可以从下拉菜单中隐藏特定的枚举值,以便只能在C++代码中使用该枚举值,而不是在编辑器中。
UENUM()
enum class ETestEnum : uint8
{
  	EnumValue1 UMETA(DisplayName = "First Value"),
    EnumValue2 UMETA(Hidden),
    EnumValue3 UMETA(DisplayName = "Third Value")
};
此时在编辑器中将无法看到Second Value。
其他标识符详见这里。
把枚举公开给蓝图
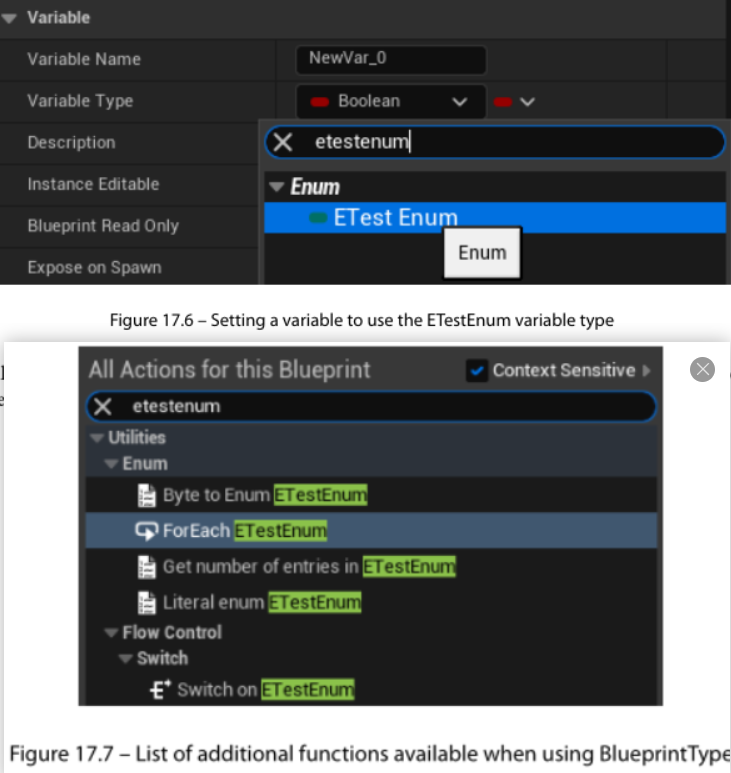
可以使用UENUM()中的BlueprintType标识符将枚举公开给蓝图,这样就能在蓝图中进行和该枚举相关的操作。
实践
接下来进行一个小实践,看看如何在UE中使用枚举,我们将要实现如下内容:
- 枚举
EWeaponType,包含手枪,霰弹枪和火箭筒。 - 枚举
EAmmoType,包含手枪子弹,霰弹子弹和火箭弹。 - 变量
Weapon,类型为EWeaponType,表示当前武器的类型; - 变量
Ammo,类型为整数数组,表示每种弹药的数量; - 当玩家按下1~3键时,武器变量将会设置为手枪,霰弹枪,火箭筒;
- 当玩家按下鼠标左键时,当前武器的弹药将被消耗;
首先在项目头文件中创建两个工具宏,它帮助我们将枚举类转换为整数或字符串:
// TestEnum.h
#define ENUM_TO_INT32(Value) static_cast<int32>(Value)
#define ENUM_TO_FSTRING(Enum, Value) FindObject<UEnum>(ANY_PACKAGE, TEXT(Enum), true)->GetDisplayNameTextByIndex(ENUM_TO_INT32(Value)).ToString()
接下来声明枚举类:
// TestEnum.h
UENUM(BlueprintType)
enum class EWeaponType : uint8
{
Pistol UMETA(DisplayName = "Glock 19"),
Shotgun UMETA(DisplayName = "Winchester M1897"),
RocketLauncher UMETA(DisplayName = "RPG"),
MAX
};
UENUM(BlueprintType)
enum class EAmmoType : uint8
{
Bullets UMETA(DisplayName = "9mm Bullets"),
Shells UMETA(DisplayName = "12 Gauge Shotgun Shells"),
Rockets UMETA(DisplayName = "RPG Rockets"),
MAX
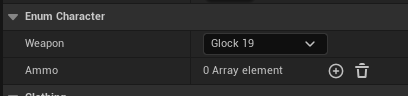
};然后在人物角色类中声明相关变量和函数:
UPROPERTY(EditDefaultsOnly, BlueprintReadOnly, Category = "Enum Character")
EWeaponType Weapon;

UPROPERTY(EditDefaultsOnly, BlueprintReadOnly, Category = "Enum Character")
TArray<int32> Ammo;

void Pistol();
void Shotgun();
void RocketLauncher();
void Fire();
有关输入绑定的内容略,看看这些函数的实现:
void ATestMultiplayerCharacter::BeginPlay()
{
// Call the base class
Super::BeginPlay();
// 初始化弹药数
constexpr int32 AmmoTypeCount = ENUM_TO_INT32(EAmmoType::MAX);
Ammo.Init(10, AmmoTypeCount);
}
void ATestMultiplayerCharacter::Tick(float DeltaSeconds)
{
Super::Tick(DeltaSeconds);
const int32 WeaponIdx = ENUM_TO_INT32(Weapon);
const FString WeaponString = ENUM_TO_FSTRING("EWeaponType", Weapon);
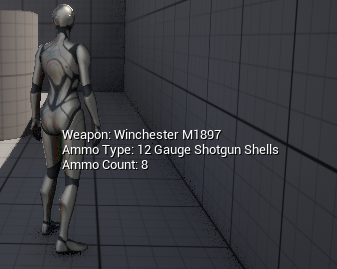
const FString AmmoString = ENUM_TO_FSTRING("EAmmoType", Weapon);
const int32 AmmoCount = Ammo[WeaponIdx];
const FString DebugStr = FString::Printf(TEXT("Weapon: %s\nAmmo Type: %s\nAmmo Count: %d"), *WeaponString, *AmmoString, AmmoCount);
DrawDebugString(GetWorld(), GetActorLocation(), DebugStr, nullptr, FColor::White, 0.0f, true);
}
void ATestMultiplayerCharacter::Pistol()
{
Weapon = EWeaponType::Pistol;
}
void ATestMultiplayerCharacter::Shotgun()
{
Weapon = EWeaponType::Shotgun;
}
void ATestMultiplayerCharacter::RocketLauncher()
{
Weapon = EWeaponType::RocketLauncher;
}
void ATestMultiplayerCharacter::Fire()
{
const int32 WeaponIdx = ENUM_TO_INT32(Weapon);
Ammo[WeaponIdx] = FMath::Max(Ammo[WeaponIdx] - 1, 0);
}最终效果如下:
参考资料
中文翻译:《UE5 C++ 游戏开发完全学习教程》
英文原版:《Elevating Game Experiences with UE5》