3 - 一个周末搞定光追Part3
开始学习大名鼎鼎的光追三部曲系列中的:Ray Tracing in One Weekend!希望我能坚持下去吧。
升级相机类
接下来开始升级相机类,让它支持Fov。由于我们的图片不是正方形,水平和垂直两方向fov不一样。这里使用垂直的fov。
支持fov
首先,光线从摄像机原点射向z=-1平面会保留。接下来看看垂直fov的样式:
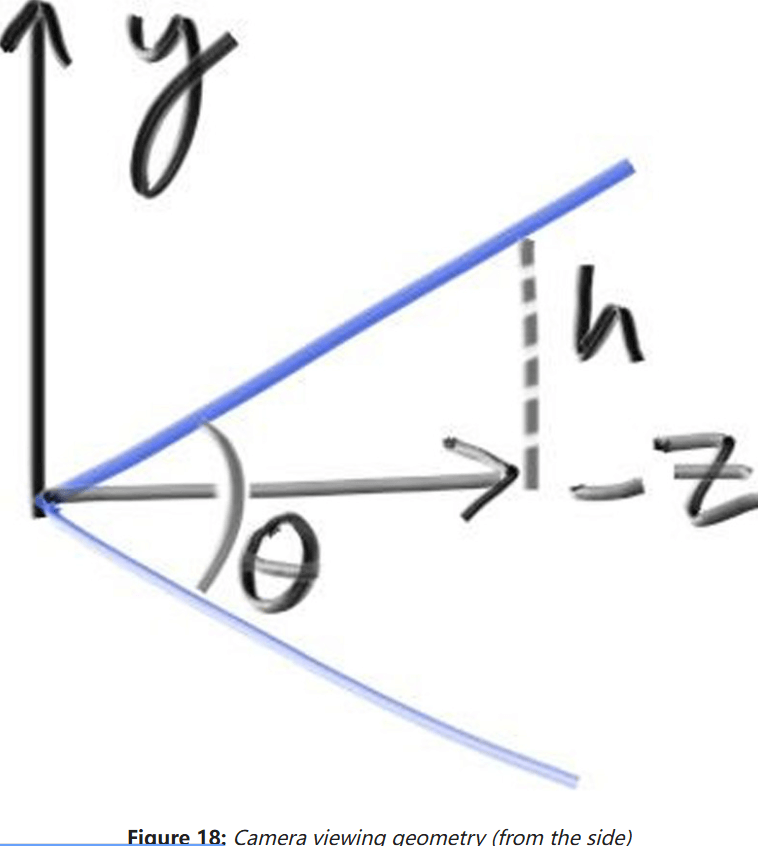
给定垂直视角fovCamara类如下:
class Camera
{
public:
	double aspectRadio = 1.0;			// 图像的宽高比
	int imgWidth = 100;					// 图像宽度
	int samples_per_pixel = 10;			// 每像素采样数, 即SPP
	int max_depth = 10;					// 光线的最大弹射次数

	double vfov = 90;					// 垂直fov

	void render(const Hittable& world) {...}

private:
	...

	void initialize()
	{
		imgHeight = static_cast<int>(imgWidth / aspectRadio);
		imgHeight = (imgHeight < 1) ? 1 : imgHeight;				// 确保高度至少为1

		center = Point3(0, 0, 0);

		pixel_sample_scale = 1.0 / samples_per_pixel;


		// 视口设定
		double focalLength = 1.0;									// 焦距
		double theta = degrees_to_radians(vfov);
		double h = std::tan(theta / 2);
		double viewportHeight = 2 * h * focalLength;
		double viewportWidth = viewportHeight * static_cast<double>(imgWidth) / imgHeight;

		...
	}
	...
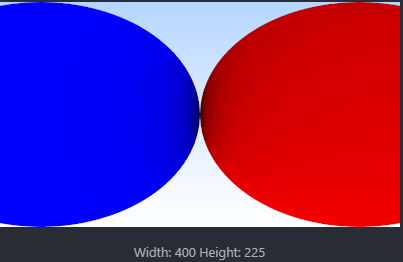
};然后用两个相切的球的场景测试一下vfov为90°的情况:
int main()
{
	const double R = std::cos(pi / 4);

	// 材质设定
	auto material_left = make_shared<Lambertian>(Color(0, 0, 1));
	auto material_right = make_shared<Lambertian>(Color(1, 0, 0));

	// 场景设定
	HittableList world;
	world.add(make_shared<Sphere>(Point3(-R, 0, -1), R, material_left));
	world.add(make_shared<Sphere>(Point3(R, 0, -1), R, material_right));

	// 初始化摄像机, 然后渲染
	Camera cam;
	cam.aspectRadio = 16.0 / 9.0;
	cam.imgWidth = 400;
	cam.samples_per_pixel = 100;
	cam.max_depth = 50;
	cam.vfov = 90;

	cam.render(world);

	return 0;
}
结果如下:
支持位置和朝向
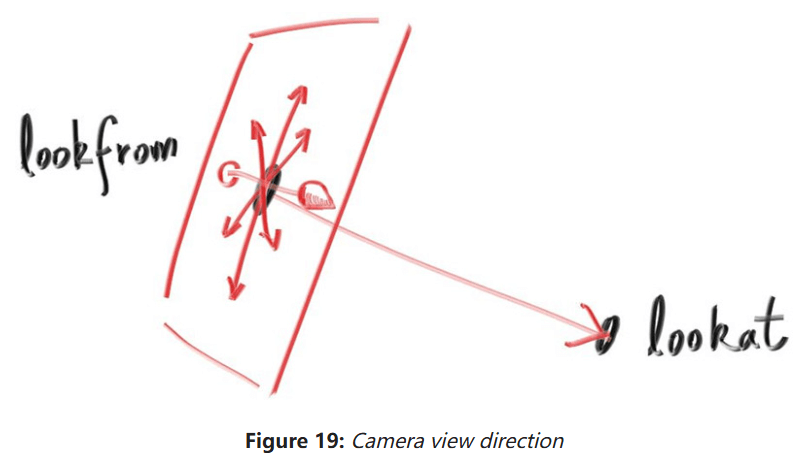
如图,lookfrom是摄像机的位置,lookat是摄像机看向的地方。此外还需要一个up向量定义摄像机的正上方,如下图:
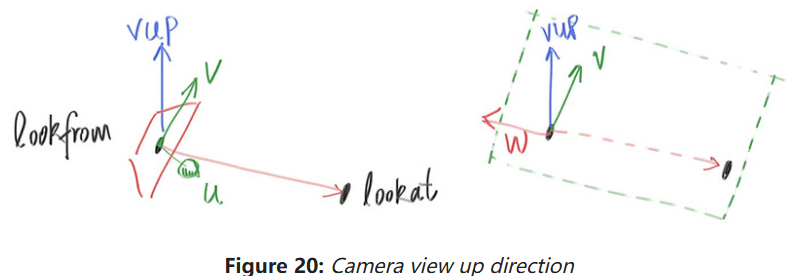
要想得到摄像机的up向量(图中的u),就要先找一个始终保持向上的向量,如世界坐标系的vup,然后经过若干叉乘和标准化后得到相机坐标系(u, v, w)。其中,u将是指向相机正右方向的单位向量;v将是指向相机正上方的单位向量;w则是指向lookat的单位向量。
首先在Camara类中编写相机的初始状态,它应该面向-z轴:
class Camera
{
public:
	double aspectRadio = 1.0;			// 图像的宽高比
	int imgWidth = 100;					// 图像宽度
	int samples_per_pixel = 10;			// 每像素采样数, 即SPP
	int max_depth = 10;					// 光线的最大弹射次数

	double vfov = 90;					// 垂直fov
	Point3 lookFrom = Point3(0, 0, 0);	// 相机本体位置
	Point3 lookAt = Point3(0, 0, -1);	// 相机看向的位置
	Vec3 vup = Vec3(0, 1, 0);			// 指向相机正上方的单位向量

	...

private:
	int imgHeight;						// 图像高度
	double pixel_sample_scale;			// spp / 1
	Point3 center;						// 相机位置
	Point3 pixel00_pos;					// 像素(0, 0)的位置
	Vec3 pixel_delta_u;					// 定位像素用的辅助向量
	Vec3 pixel_delta_v;
	Vec3 u, v, w;						// 相机空间的三个坐标轴

	void initialize()
	{
		imgHeight = static_cast<int>(imgWidth / aspectRadio);
		imgHeight = (imgHeight < 1) ? 1 : imgHeight;				// 确保高度至少为1

		center = lookFrom;

		pixel_sample_scale = 1.0 / samples_per_pixel;


		// 视口设定
		double focalLength = (lookFrom - lookAt).length();									// 焦距
		double theta = degrees_to_radians(vfov);
		double h = std::tan(theta / 2);
		double viewportHeight = 2 * h * focalLength;
		double viewportWidth = viewportHeight * static_cast<double>(imgWidth) / imgHeight;

		// 相机坐标系初始化
		w = unitVector(lookFrom - lookAt);
		u = unitVector(cross(vup, w));
		v = cross(w, u);

		// 4个辅助向量
		Vec3 viewport_u = viewportWidth * u;
		Vec3 viewport_v = viewportHeight * -v;
		pixel_delta_u = viewport_u / imgWidth;
		pixel_delta_v = viewport_v / imgHeight;

		// 计算第一个像素位置
		Point3 viewport_upper_left = center - (focalLength * w) - viewport_u / 2 - viewport_v / 2;
		pixel00_pos = viewport_upper_left + 0.5 * (pixel_delta_u + pixel_delta_v);
	}

	...
};
然后切换回之前的场景,并修改相机位置和朝向:
int main()
{
	// 材质设定
	auto material_ground = make_shared<Lambertian>(Color(0.8, 0.8, 0.0));
	auto material_center = make_shared<Lambertian>(Color(0.1, 0.2, 0.5));
	auto material_left = make_shared<Dielectric>(1.50);
	auto material_bubble = make_shared<Dielectric>(1.00 / 1.50);
	auto material_right = make_shared<Metal>(Color(0.8, 0.6, 0.2), 1.0);

	// 场景设定
	HittableList world;
	world.add(make_shared<Sphere>(Point3(0.0, -100.5, -1.0), 100.0, material_ground));
	world.add(make_shared<Sphere>(Point3(0.0, 0.0, -1.2), 0.5, material_center));
	world.add(make_shared<Sphere>(Point3(-1.0, 0.0, -1.0), 0.5, material_left));
	world.add(make_shared<Sphere>(Point3(-1.0, 0.0, -1.0), 0.4, material_bubble));
	world.add(make_shared<Sphere>(Point3(1.0, 0.0, -1.0), 0.5, material_right));

	// 初始化摄像机, 然后渲染
	Camera cam;
	cam.aspectRadio = 16.0 / 9.0;
	cam.imgWidth = 400;
	cam.samples_per_pixel = 100;
	cam.max_depth = 50;

	cam.vfov = 90;
	cam.lookFrom = Point3(-2, 2, 1);
	cam.lookAt = Point3(0, 0, -1);
	cam.vup = Vec3(0, 1, 0);

	cam.render(world);

	return 0;
}
结果如下:
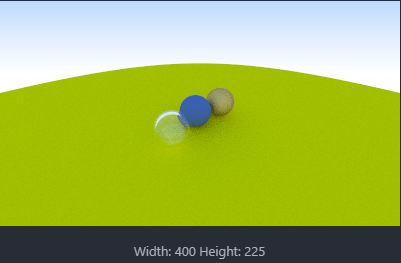
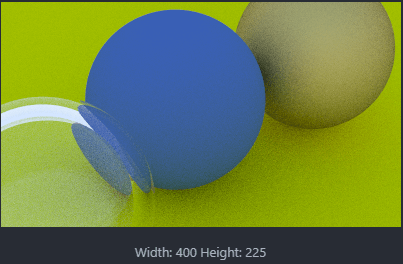
缩小vfov可达到放大的效果,例如vfov为20时,渲染结果如下:
散焦模糊
接下来实现本书最后一个特性:散焦模糊(Defocus Blur),和景深(depth of field)不一样。对于真实的相机,可以通过增大光圈造成散焦模糊。而在这里我们只需添加一个“透镜”即可实现散焦模糊。
薄透镜近似
可以用薄透镜近似模拟真实相机:
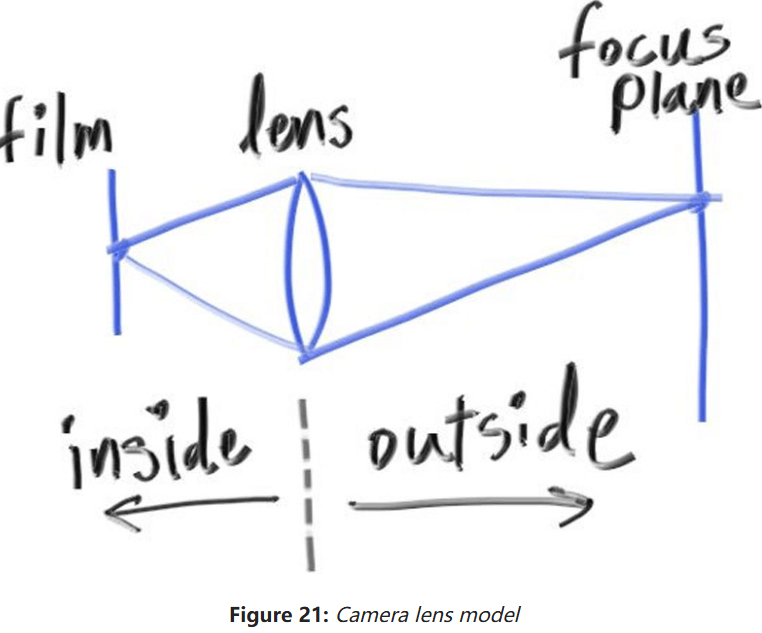
可以从无线薄的圆透镜发射光线,然后将它们发送到焦平面上的像素中,距离一个焦距,在焦平面上的图形是完全聚焦的。可以直接把视口放到焦平面上:
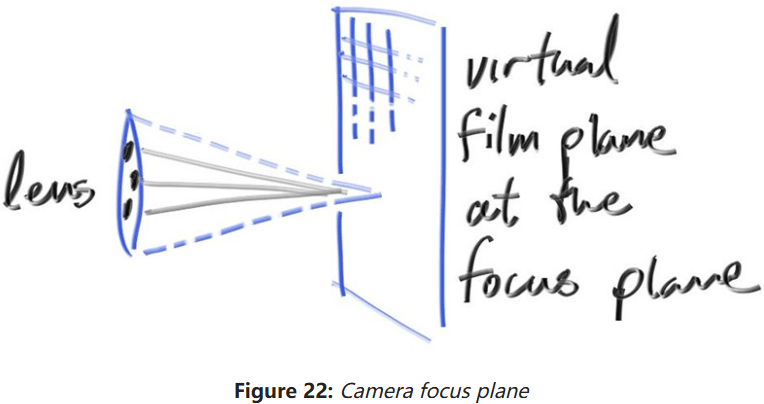
接下来捋捋思路:
- 焦平面和视口重叠
- 像素表格排列在视口内部
- 在当前像素区域,随机采样几个位置的图片
- 摄像机在透镜的随机位置发射光线,落到当前图片采样位置
随机生成采样光
没有散焦模糊,所有场景的光线都从摄像机的lookFrom发出。为了完成散焦模糊,我们需要创建一个以lookForm为中心的圆盘。圆盘的半径越大,散焦模糊的效果越强。可以认为我们之前的相机圆盘半径是0(没有散焦模糊)。
接下来在Vec3类中编写random_in_unit_disk(),以进行单位圆盘采样:
// 单位圆盘随机采样
inline Vec3 random_in_unit_disk()
{
	while (true)
	{
		Vec3 p = Vec3(random_double(-1, 1), random_double(-1, 1), 0);
		if (p.lengthSquared() < 1)
		{
			return p;
		}
	}
}然后更新Camera类实现散焦模糊:
class Camera
{
public:
	double aspectRadio = 1.0;			// 图像的宽高比
	int imgWidth = 100;					// 图像宽度
	int samples_per_pixel = 10;			// 每像素采样数, 即SPP
	int max_depth = 10;					// 光线的最大弹射次数

	double vfov = 90;					// 垂直fov
	Point3 lookFrom = Point3(0, 0, 0);	// 相机本体位置
	Point3 lookAt = Point3(0, 0, -1);	// 相机看向的位置
	Vec3 vup = Vec3(0, 1, 0);			// 指向相机正上方的单位向量

	double defocus_angle = 0;			// 光线通过每个像素的变化角度
	double focus_dist = 10;				// 焦距

	...

private:
	int imgHeight;						// 图像高度
	double pixel_sample_scale;			// spp / 1
	Point3 center;						// 相机位置
	Point3 pixel00_pos;					// 像素(0, 0)的位置
	Vec3 pixel_delta_u;					// 定位像素用的辅助向量
	Vec3 pixel_delta_v;
	Vec3 u, v, w;						// 相机空间的三个坐标轴
	Vec3 defocus_disk_u;				// 散焦模糊的水平和竖直半径
	Vec3 defocus_disk_v;

	void initialize()
	{
		imgHeight = static_cast<int>(imgWidth / aspectRadio);
		imgHeight = (imgHeight < 1) ? 1 : imgHeight;				// 确保高度至少为1

		center = lookFrom;

		pixel_sample_scale = 1.0 / samples_per_pixel;

		// 视口设定
		double theta = degrees_to_radians(vfov);
		double h = std::tan(theta / 2);
		double viewportHeight = 2 * h * focus_dist;
		double viewportWidth = viewportHeight * static_cast<double>(imgWidth) / imgHeight;

		// 相机坐标系初始化
		w = unitVector(lookFrom - lookAt);
		u = unitVector(cross(vup, w));
		v = cross(w, u);

		// 4个辅助向量
		Vec3 viewport_u = viewportWidth * u;
		Vec3 viewport_v = viewportHeight * -v;
		pixel_delta_u = viewport_u / imgWidth;
		pixel_delta_v = viewport_v / imgHeight;

		// 计算第一个像素位置
		Point3 viewport_upper_left = center - (focus_dist * w) - viewport_u / 2 - viewport_v / 2;
		pixel00_pos = viewport_upper_left + 0.5 * (pixel_delta_u + pixel_delta_v);

		// 计算散焦模糊的半径
		double defocus_radius = focus_dist * std::tan(degrees_to_radians(defocus_angle / 2));
		defocus_disk_u = u * defocus_radius;
		defocus_disk_v = v * defocus_radius;
	}

	// 随机生成一条从摄像机原点为中心的圆盘出发, 到达像素(i,j)周围的光线
	Ray get_ray(int i, int j) const
	{
		Vec3 offset = sample_square();
		Point3 pixel_sample = pixel00_pos + ((i + offset.x()) * pixel_delta_u) + ((j + offset.y()) * pixel_delta_v);

		Point3 ray_origin = (defocus_angle <= 0) ? center : defocus_disk_sample();
		Vec3 ray_direction = pixel_sample - ray_origin;

		return Ray(ray_origin, ray_direction);
	}

	Vec3 sample_square() const { ... }

	// 返回圆盘的随机2d偏移量
	Point3 defocus_disk_sample() const
	{
		Point3 p = random_in_unit_disk();
		return center + (p[0] * defocus_disk_u) + (p[1] * defocus_disk_v);
	}

	Color ray_color(const Ray& r, int depth, const Hittable& world) const { ... }
};
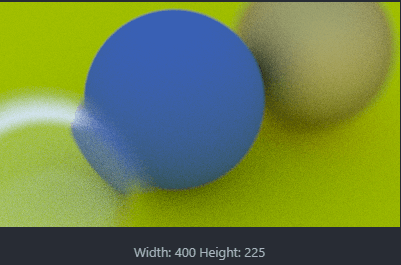
使用大一点的圆盘透镜看看:
cam.defocus_angle = 10.0;
cam.focus_dist = 3.4;
结果如下:
接下来干什么
最终的渲染器
接下来渲染一下本书的封面——许多随机的球:
int main() {
    HittableList world;

    auto ground_material = make_shared<Lambertian>(Color(0.5, 0.5, 0.5));
    world.add(make_shared<Sphere>(Point3(0, -1000, 0), 1000, ground_material));

    for (int a = -11; a < 11; a++) {
        for (int b = -11; b < 11; b++) {
            auto choose_mat = random_double();
            Point3 center(a + 0.9 * random_double(), 0.2, b + 0.9 * random_double());

            if ((center - Point3(4, 0.2, 0)).length() > 0.9) {
                shared_ptr<Material> sphere_material;

                if (choose_mat < 0.8) {
                    // diffuse
                    auto albedo = Color::random() * Color::random();
                    sphere_material = make_shared<Lambertian>(albedo);
                    world.add(make_shared<Sphere>(center, 0.2, sphere_material));
                }
                else if (choose_mat < 0.95) {
                    // metal
                    auto albedo = Color::random(0.5, 1);
                    auto fuzz = random_double(0, 0.5);
                    sphere_material = make_shared<Metal>(albedo, fuzz);
                    world.add(make_shared<Sphere>(center, 0.2, sphere_material));
                }
                else {
                    // glass
                    sphere_material = make_shared<Dielectric>(1.5);
                    world.add(make_shared<Sphere>(center, 0.2, sphere_material));
                }
            }
        }
    }

    auto material1 = make_shared<Dielectric>(1.5);
    world.add(make_shared<Sphere>(Point3(0, 1, 0), 1.0, material1));

    auto material2 = make_shared<Lambertian>(Color(0.4, 0.2, 0.1));
    world.add(make_shared<Sphere>(Point3(-4, 1, 0), 1.0, material2));

    auto material3 = make_shared<Metal>(Color(0.7, 0.6, 0.5), 0.0);
    world.add(make_shared<Sphere>(Point3(4, 1, 0), 1.0, material3));

    Camera cam;

    cam.aspectRadio = 16.0 / 9.0;
    cam.imgWidth = 1200;
    cam.samples_per_pixel = 500;
    cam.max_depth = 50;

    cam.vfov = 20;
    cam.lookFrom= Point3(13, 2, 3);
    cam.lookAt = Point3(0, 0, 0);
    cam.vup = Vec3(0, 1, 0);

    cam.defocus_angle = 0.6;
    cam.focus_dist = 10.0;

    cam.render(world);
}
可能的结果如下(渲染了11小时还没渲染完,直接结束了):
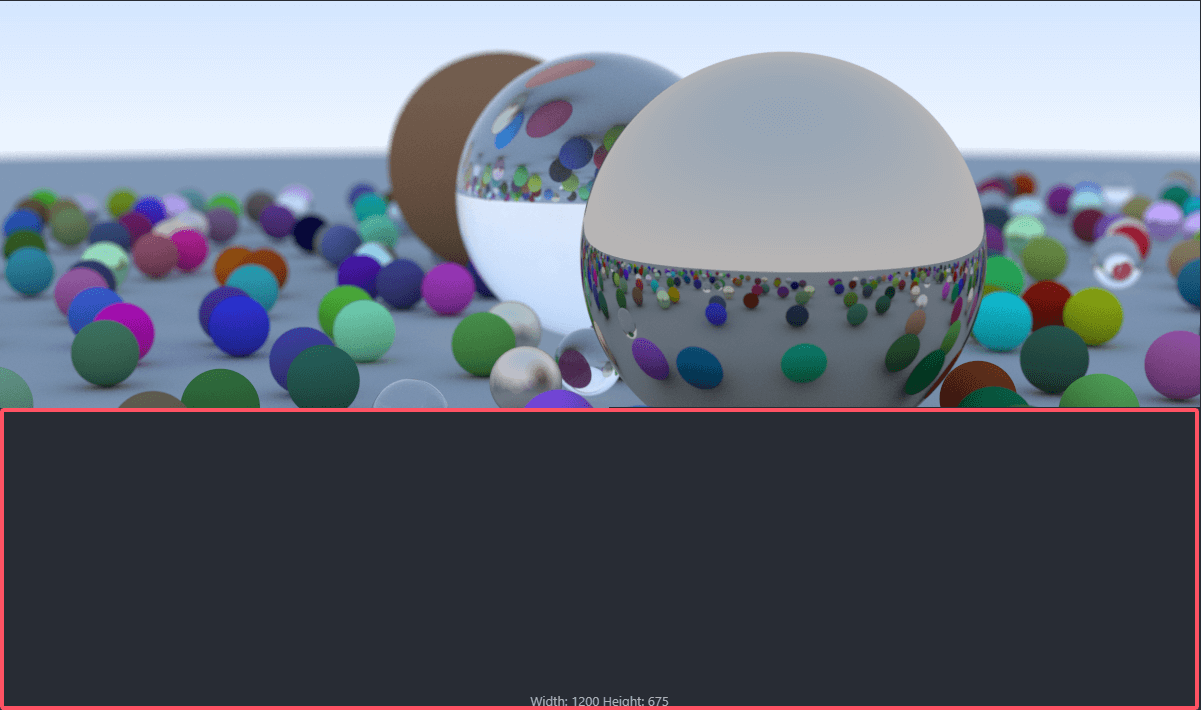
实在等不行了,要想渲染完至少要差不多一天时间。待我看看视频研究研究多线程加速。
接下来的步骤
第二本书:下一周的光追
基于第一本书的光线追踪器继续开发,多了如下新特点:
- 动态模糊(Motion Blur),更真实地渲染移动物体;
- BVH(Bounding Volume Hierarchies),加速渲染复杂场景;
- 材质贴图,将图片贴在物体上;
- 柏林噪声,一个用于各种技术的随机噪声生成器;
- 四边形,是圆盘、三角形、环以及其他2D图元的基础;
- 变换,用于摆放和旋转物体;
- 体素渲染,渲染云、雾等大气;
第三本书:余生的光追
这本书拓展了第二本书的内容,基本上都是和提高渲染质量和性能有关,并且聚焦于生成正确的光线并近似地累计它们。适用于对专业级光追感兴趣的人,实现一些高级效果,例如次表面散射等。
其他方向
三角形:许多模型都由三角形组成,如何读写这些三角形很有挑战;
多线程:渲染一张图的速度太慢了,不妨试试多线程并行加速渲染;
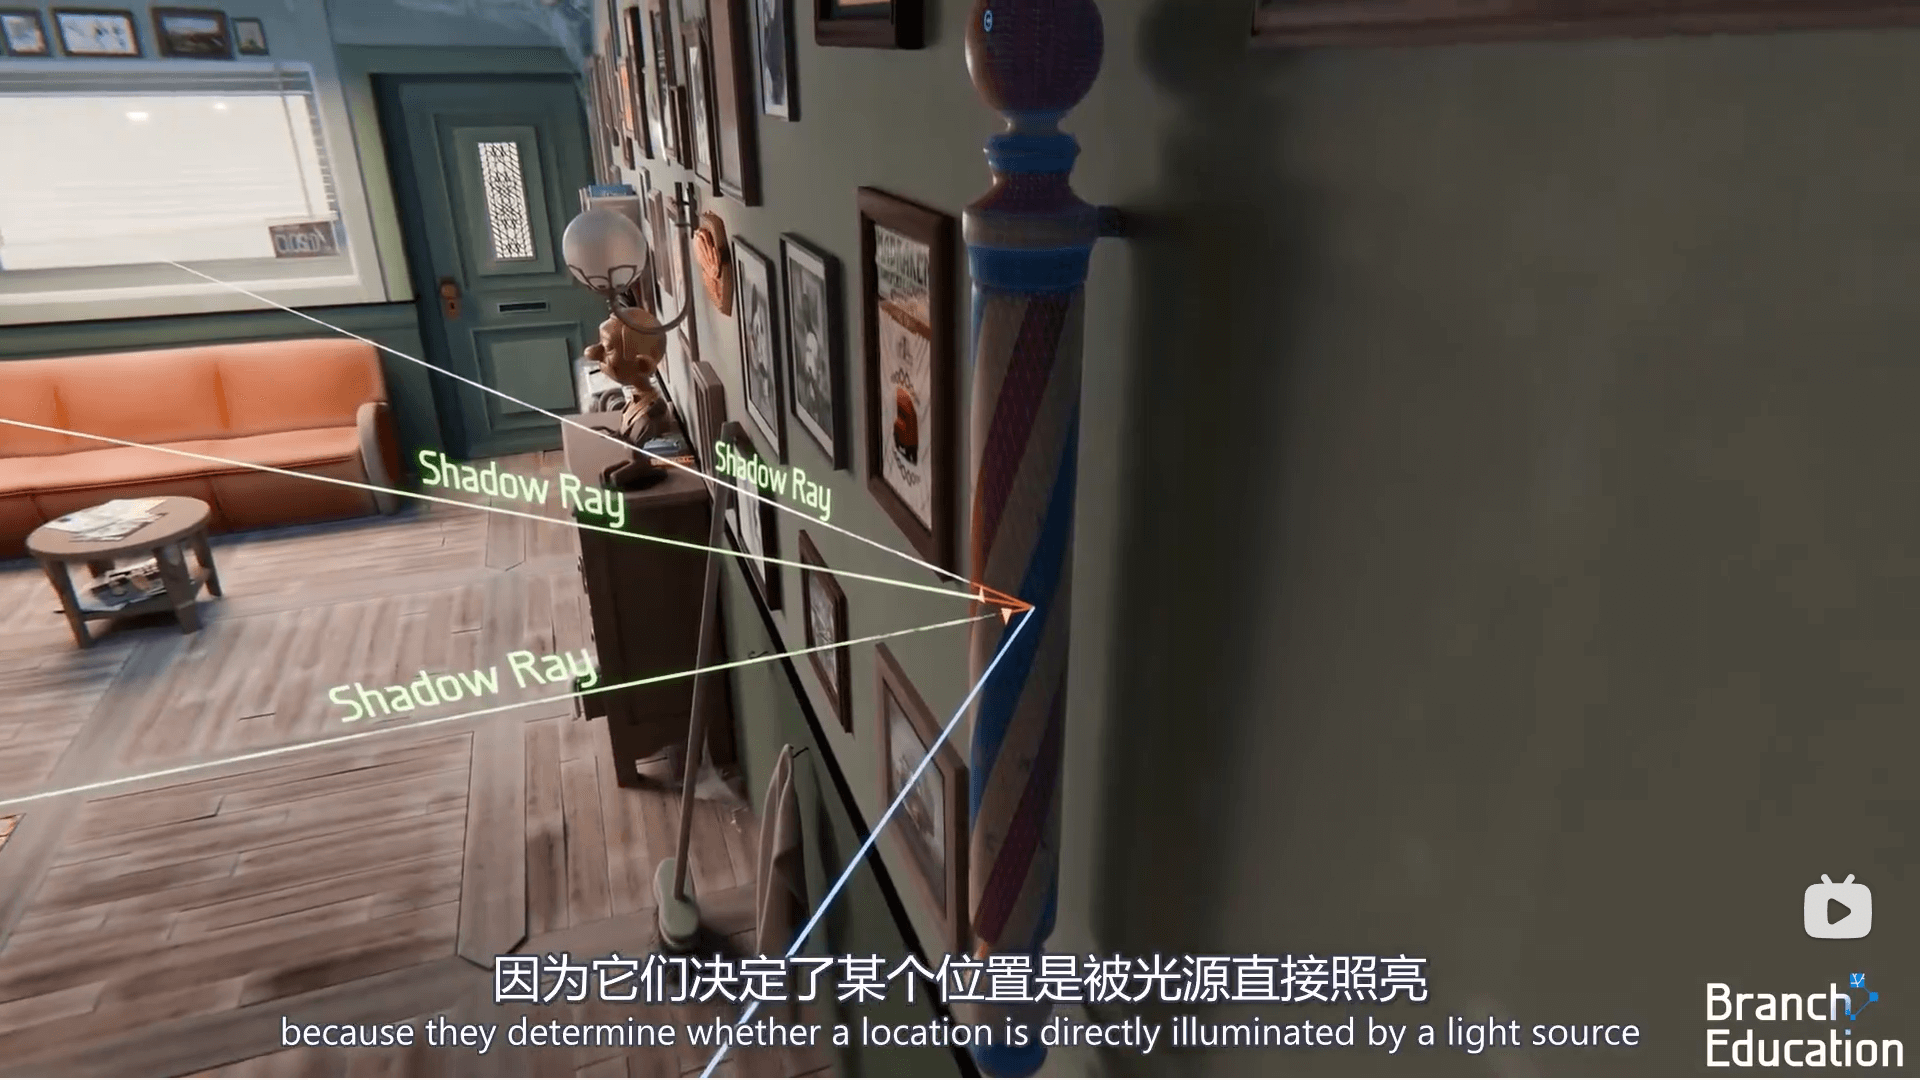
阴影:当从光源发射光线时,可以决定一个点是如何渲染阴影。这样就能渲染软、硬阴影了。
![Shadow Ray]()
额外优化
多线程
实现自旋锁
首先自己实现一个自旋锁SpinLock和管理它的MyLockGuard类:
#pragma once

#include <atomic>
#include <thread>

class SpinLock
{
public:
	void acquire()
	{
		while (flag.test_and_set(std::memory_order_acquire))
		{
			std::this_thread::yield();
		}
	}

	void release()
	{
		flag.clear(std::memory_order_release);
	}

private:
	std::atomic_flag flag;
};

class MyLockGuard
{
public:
	MyLockGuard(SpinLock& spin_lock) : spin_lock(spin_lock) { spin_lock.acquire(); }
	~MyLockGuard() { spin_lock.release(); }

private:
	SpinLock& spin_lock;
};
实现简易线程池
然后实现一个简易线程池类ThreadPool,只有主线程main添加子任务是线程安全的,子线程添加子任务会出bug:
#pragma once

#include "spin_lock.hpp"

#include <vector>
#include <queue>
#include <thread>
#include <functional>

// 一个线程执行一个Task
class Task
{
public:
	virtual void run() = 0;
};

// 并行For循环的任务
class ParallelForTask : public Task
{
public:
	ParallelForTask(size_t x, size_t y, const std::function<void(size_t, size_t)>& lambda)
		: x(x), y(y), lambda(lambda) {}

	void run() override
	{
		lambda(x, y);
	}

private:
	size_t x, y;
	std::function<void(size_t, size_t)> lambda;
};

class ThreadPool
{
public:
	// 每个线程开始前执行的默认函数
	static void WorkerThread(ThreadPool* master)
	{
		while (master->alive == 1)
		{
			Task* task = master->getTask();
			if (task != nullptr)
			{
				task->run();
				--master->pending_task_count;
			}
			else
			{
				// 当前线程“放弃”执行,让操作系统调度另一线程继续执行
				std::this_thread::yield();
			}
		}
	}

	ThreadPool(size_t thread_count = 0)
	{
		alive = 1;
		pending_task_count = 0;

		// 如果为0, 就赋值成CPU线程数
		if (thread_count == 0)
		{
			thread_count = std::thread::hardware_concurrency();
		}
		for (size_t i = 0; i < thread_count; ++i)
		{
			threads.push_back(std::thread(ThreadPool::WorkerThread, this));
		}
	}

	~ThreadPool()
	{
		wait();
		alive = 0;
		for (auto& thread : threads)
		{
			thread.join();
		}
		threads.clear();
	}

	// 让Main线程等待所有子线程执行完毕
	void wait() const
	{
		while (pending_task_count > 0)
		{
			std::this_thread::yield();
		}
	}

	// 并行For循环
	void parallelFor(size_t width, size_t height, const std::function<void(size_t, size_t)>& lambda)
	{
		MyLockGuard guard(spin_lock);
		for (size_t x = 0; x < width; ++x)
		{
			for (size_t y = 0; y < height; ++y)
			{
				++pending_task_count;
				tasks.push(new ParallelForTask(x, y, lambda));
			}
		}
	}

	// 为线程池添加任务
	void addTask(Task* task)
	{
		// 保证同时只有一个线程添加任务
		MyLockGuard guard(spin_lock);
		++pending_task_count;
		tasks.push(task);
	}

	// 为线程池获取任务
	Task* getTask()
	{
		// 保证同时只有一个线程获取任务
		MyLockGuard guard(spin_lock);
		if (tasks.empty())
		{
			return nullptr;
		}
		Task* task = tasks.front();
		tasks.pop();
		return task;
	}

private:
	std::atomic<int> alive;						// 线程池是否还存在
	std::atomic<int> pending_task_count;		// 正在/将要执行的任务数
	std::vector<std::thread> threads;
	std::queue<Task*> tasks;
	SpinLock spin_lock;
};
实现胶片类
还要新建一个胶片类Film,用于存储一张渲染好的图片:
#pragma once

#include "../rtweekend.h"

#include <fstream>
#include <filesystem>
#include <vector>

// 相机的胶片, 负责存储整个视口
class Film
{
public:
	Film(size_t width, size_t height) : width(width), height(height)
	{
		pixels.resize(width * height);
	}

	// 存储PPM P6格式
	void save(const std::filesystem::path& filename)
	{
		std::ofstream file(filename, std::ios::binary);
		file << "P6\n" << width << ' ' << height << "\n255\n";

		for (size_t y = 0; y < height; ++y)
		{
			for (size_t x = 0; x < width; ++x)
			{
				const Color& color = getPixel(x, y);
				writeColor(file, color);
			}
		}
	}

	// Getter & Setters
	size_t getWidth() const { return width; }
	size_t getHeight() const { return height; }
	Color getPixel(size_t x, size_t y) const { return pixels[y * width + x]; }
	void setPixel(size_t x, size_t y, const Color& color) { pixels[y * width + x] = color; }

private:
	size_t width, height;
	std::vector<Color> pixels;
};这里使用PPM P6格式存储图片,和PPM P3格式相比,它省去了空格和换行符,使用二进制存储,节省了一定的空间和时间。
最后修改一下相机类Camara,让其适配线程池和胶片:
void render(const Hittable& world)
{
	initialize();

	ThreadPool thread_pool;
	Film film(imgWidth, imgHeight);

	thread_pool.parallelFor(film.getWidth(), film.getHeight(), [&](size_t x, size_t y)
	{
		Color final_pixel_color(0, 0, 0);
		for (int sampleCnt = 0; sampleCnt < samples_per_pixel; ++sampleCnt)
		{
			Ray r = get_ray(x, y);
			final_pixel_color += ray_color(r, max_depth, world);
		}
		film.setPixel(x, y, pixel_sample_scale * final_pixel_color);
	});
	thread_pool.wait();

	film.save("filmTest.ppm");
}
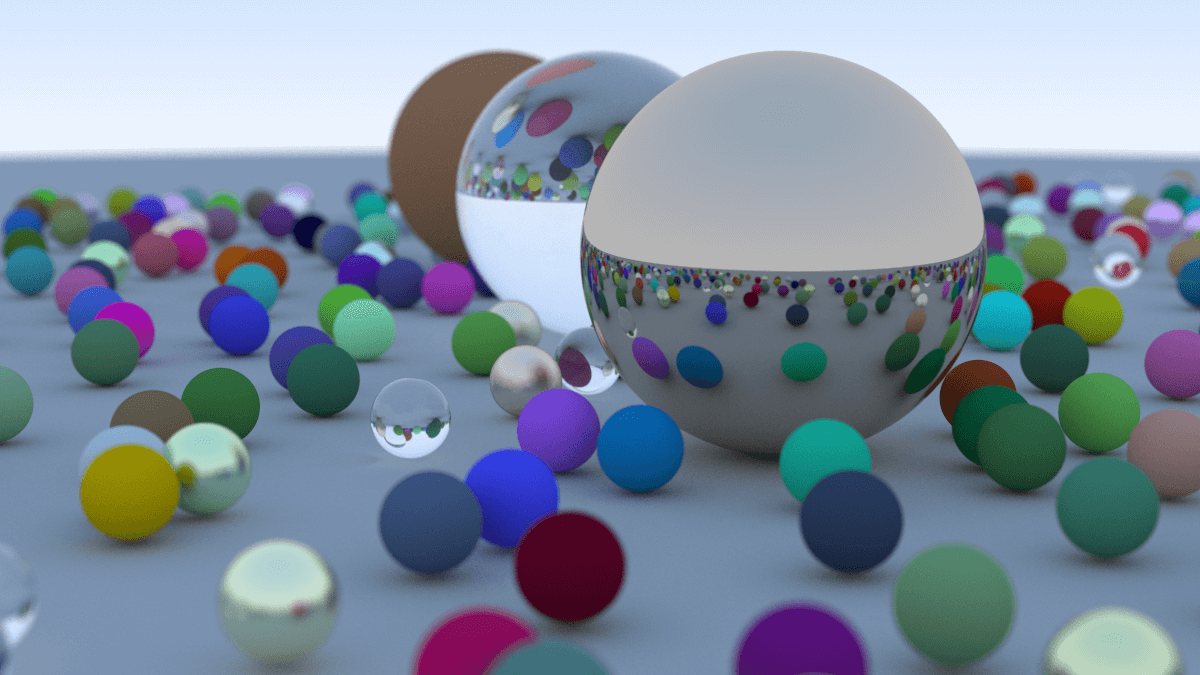
最终结果如下,渲染只需3小时左右,效率大大提升:
继续优化
实际上,这个并行for循环还能进行优化。由于上面的方法是给每一个线程分配一个像素,导致有的线程递归多,有的少,出现负载不平衡,从而影响整体渲染效率。
可以使用 动态任务分配 的方法,避免线程因某些像素递归过多而负载过高。可以将场景中的像素分成小块,每个线程动态领取任务块,而不是提前固定分配给每个线程。
修改后的parallelFor()如下:
// 并行For循环的任务
class ParallelForTask : public Task
{
public:
	ParallelForTask(size_t x, size_t y, size_t chunk_width, size_t chunk_height, const std::function<void(size_t, size_t)>& lambda)
		: x(x), y(y), chunk_width(chunk_width), chunk_height(chunk_height), lambda(lambda) {}

	void run() override
	{
		for (size_t offset_x = 0; offset_x < chunk_width; ++offset_x)
		{
			for (size_t offset_y = 0; offset_y < chunk_height; ++offset_y)
			{
				lambda(x + offset_x, y + offset_y);
			}
		}
	}

private:
	size_t x, y, chunk_width, chunk_height;
	std::function<void(size_t, size_t)> lambda;
};

// 并行For循环
void parallelFor(size_t width, size_t height, const std::function<void(size_t, size_t)>& lambda)
{
	MyLockGuard guard(spin_lock);

	// 计算区块宽高
	double chunk_width_f = static_cast<double>(width) / std::sqrt(16) / std::sqrt(threads.size());
	double chunk_height_f = static_cast<double>(height) / std::sqrt(16) / std::sqrt(threads.size());
	size_t chunk_width = std::ceil(chunk_width_f);
	size_t chunk_height = std::ceil(chunk_height_f);

	for (size_t x = 0; x < width; x += chunk_width)
	{
		for (size_t y = 0; y < height; y += chunk_height)
		{
			++pending_task_count;
			if (x + chunk_width > width)	chunk_width = width - x;
			if (y + chunk_height > height)	chunk_height = height - y;
			tasks.push(new ParallelForTask(x, y, chunk_width, chunk_height, lambda));
		}
	}
}
模型渲染
只有球还是太枯燥了,接下来看看模型是如何渲染的。
三角形的数学定义
模型是由三角形组成的,三角形的数学定义如下:
- 三个顶点V1,V2,V3
- 每个顶点包括:位置
,法线方向 。
光线和三角形相交
详见Games101中Whitted-Style 光线追踪部分。使用Moller Trumbore算法,将三角形用重心坐标表示,并和光线方程联立,最后用克莱姆法则求解线性方程组:
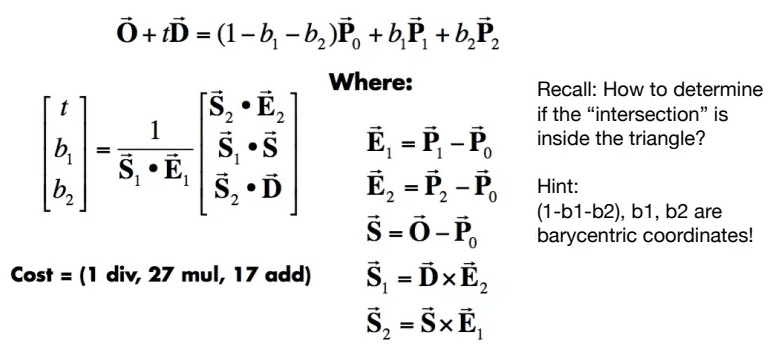
其中
代码实现
定义三角形类Triangle如下:
#pragma once

#include "../ray/hittable.hpp"

class Triangle : public Hittable
{
public:
	Triangle(const Point3& p0, const Point3& p1, const Point3& p2,
			 const Vec3& n0, const Vec3& n1, const Vec3& n2,
			 shared_ptr<Material> material)
		: p0(p0), p1(p1), p2(p2), n0(n0), n1(n1), n2(n2), material(material) {}

	Triangle(const Point3& p0, const Point3& p1, const Point3& p2,
			 shared_ptr<Material> material)
		: p0(p0), p1(p1), p2(p2), material(material)
	{
		Vec3 e1 = p1 - p0;
		Vec3 e2 = p2 - p0;
		Vec3 normal = unitVector(cross(e1, e2));
		n0 = normal;
		n1 = normal;
		n2 = normal;
	}

	bool hit(const Ray& r, Interval ray_t, HitRecord& rec) const override
	{
		// 使用MT法判光线和三角形面相交
		Vec3 e1 = p1 - p0;
		Vec3 e2 = p2 - p0;
		Vec3 s1 = cross(r.direction(), e2);
		double inv_det = 1.0 / dot(s1, e1);

		Vec3 s = r.origin() - p0;
		double u = dot(s1, s) * inv_det;
		if (u < 0 || u > 1) { return false; }

		Vec3 s2 = cross(s, e1);
		double v = dot(s2, r.direction()) * inv_det;
		if (v < 0 || u + v > 1) { return false; }

		double hit_t = dot(s2, e2) * inv_det;
		if (ray_t.surrounds(hit_t))
		{
			// 将三顶点法线进行插值
			Vec3 normal = (1.0 - u - v) * n0 + u * n1 + v * n2;

			// 记录相交信息
			rec.t = hit_t;
			rec.position = r.at(hit_t);
			rec.normal = unitVector(normal);
			// rec.set_face_normal(r, unitVector(normal));
			rec.material = material;

			return true;
		}
		return false;
	}

private:
	Point3 p0, p1, p2;	// 三角形的顶点位置信息
	Vec3 n0, n1, n2;	// 三角形的顶点法线信息
	shared_ptr<Material> material;
};
在三角形类中,
然后定义模型类Model如下:
#pragma once

#include "triangle.hpp"

#include <vector>
#include <filesystem>
#include <fstream>
#include <sstream>

class Model : public Hittable
{
public:
	Model(const std::vector<Triangle>& triangles, shared_ptr<Material> material)
		: triangles(triangles), material(material) {}
	Model(const std::filesystem::path& filename, shared_ptr<Material> material)
		: material(material)
	{
		// obj格式文件
		// 顶点:		v	1 2 3
		// 法向量:	vn	1 2 3
		// 三角形:	f	p0//n0 p1//n1 p2//n2
		std::vector<Point3> positions;
		std::vector<Vec3> normals;

		std::ifstream file(filename);
		if (!file.good())
		{
			std::cout << "打开文件 " << filename << " 失败!\n";
			return;
		}

		std::string line;
		char trash;
		while (!file.eof())
		{
			std::getline(file, line);
			std::istringstream iss(line);

			// 读取顶点
			if (line.compare(0, 2, "v ") == 0)
			{
				Point3 pos;
				iss >> trash >> pos.e[0] >> pos.e[1] >> pos.e[2];
				positions.push_back(pos);
			}
			// 读取法向量
			else if (line.compare(0, 3, "vn ") == 0)
			{
				Vec3 normal;
				iss >> trash >> trash >> normal.e[0] >> normal.e[1] >> normal.e[2];
				normals.push_back(normal);
			}
			// 读取三角形
			else if (line.compare(0, 2, "f ") == 0)
			{
				int p0, p1, p2, n0, n1, n2;
				iss >> trash;
				iss >> p0 >> trash >> trash >> n0;
				iss >> p1 >> trash >> trash >> n1;
				iss >> p2 >> trash >> trash >> n2;

				triangles.push_back(Triangle(
					positions[p0 - 1], positions[p1 - 1], positions[p2 - 1],
					normals[n0 - 1], normals[n1 - 1], normals[n2 - 1],
					material
				));
			}
		}
	}

	bool hit(const Ray& r, Interval ray_t, HitRecord& rec) const override
	{
		bool isHit = false;
		for (const auto& triangle : triangles)
		{
			HitRecord tri_rec;
			if (triangle.hit(r, ray_t, tri_rec))
			{
				isHit = true;
				ray_t.max = tri_rec.t;
				rec = tri_rec;
			}
		}

		return isHit;
	}
private:
	std::vector<Triangle> triangles;
	shared_ptr<Material> material;
};最后修改main函数:
// 材质设定
auto material_center = make_shared<Lambertian>(Color(0.1, 0.2, 0.5));

// 场景设定
HittableList world;
world.add(make_shared<Model>("models/simple_dragon.obj", material_center));

// 初始化摄像机, 然后渲染
Camera cam;
cam.aspectRadio = 16.0 / 9.0;
cam.imgWidth = 400;
cam.samples_per_pixel = 100;
cam.max_depth = 50;

cam.vfov = 90;
cam.lookFrom = Point3(-0.6, 0, 0);
cam.lookAt = Point3(0, 0, 0);
cam.vup = Vec3(0, 1, 0);

cam.render(world);
最终效果如下:
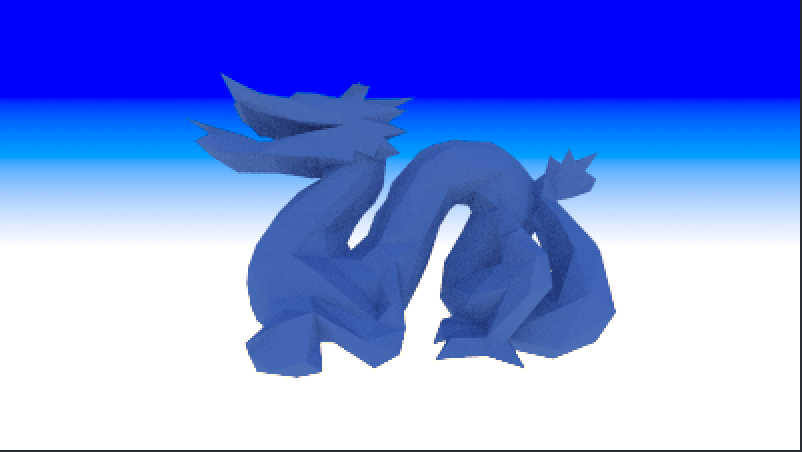
参考资料
- Ray Tracing in One Weekend
- 从0开始的光追渲染器 HeaoYe B站
